
Post Production in Octane for C4D
Part 2: AOV / Render Pass Deep Dive
About This Guide
This is part 2 of the Post Production in Octane for C4D guide series. It focuses on the passes (or AOVs) themselves. There are a few C4D-specific things in this particular guide, but most of the information here should be sound for any version of the Octane 2021 plugin or Standalone.
Part 1 focuses on the setup and the mechanics of the AOV system. If you haven’t read it yet, it’s probably worth reviewing before reading this guide. This series also contains a setup checklist to help you remember all the various steps to creating a multipass project.
Note: This guide uses the terms AOV and Render Pass interchangeably.
Note about versions
This guide is written for the 2021 release of Octane. The entire render passes system has been revamped, and the AOV system has been fully implemented in this version. The information about the passes themselves is still valid for older versions of Octane, but anything having to do with AOVs is really only relevant to the 2021 release and newer.
Intro
In this guide, we’re going to cover the most commonly used AOVs: Beauty Passes, Light Passes, Object Mask Passes (including Render Layer and Cryptomatte) and Info/Aux/Utility Passes.

There are two different sets (stacks) of passes that - when combined in post - make up the final beauty render. The first set is a stack of beauty passes, which refers to properties of all the materials in the scene like diffuse, reflection, refraction, etc. When all the appropriate beauty passes are merged, you end up with a final render (beauty pass).
The second way is to create a stack of lighting passes, which pulls data from all the various light sources and combines them to form the final beauty pass.
Which stack you choose depends on what you’re going to do with all the passes in post. In some workflows, you’ll want to adjust the color of objects or dial back/bring out certain attributes related to the materials and objects - for this, you’d generate beauty passes. In other cases the materials are all fine, but you might want to bring up or down lights in post - for that you’d use a lighting pass stack.
Both of these stacks produce the same result, so if you were to combine all the beauty passes AND all the lighting passes, you’d end up with a blown out image. If you need control over both lights and materials the same composite, you have to do some work to figure out how to negate the effects of part of one stack before overlaying the second stack. There are a number of utility passes that are useful for this.
Beauty Passes
Beauty passes are the visual components that make up a render. This type of pass is based on the properties of the materials you have in your scene.
To get a complete image once it’s reassembled, you need to turn on all of the beauty AOVs that have some kind of contribution to your render. You can test this out by adding all the possible ones, and then using the tabs that appear in the Live Viewer to see whether anything renders in each particular pass. If the pass is 100% black, remove it so you don’t add unnecessary time and data to the render.
If you don’t render a pass that contributes to the overall render (say you have some emissive materials and forget to render an emissive pass), then when you combine all the passes to recreate the final render in post, it won’t look the same as your beauty pass.

Diffuse Passes
In the above illustration, the sphere has a 100% diffuse/albedo material applied (no reflection/refraction/etc). The floor has some reflection in it, which you’ll notice is gone in all of the diffuse passes (reflection shows up in the reflection passes, not diffuse).
The Diffuse pass shows all the light (direct and indirect) on the diffuse materials in the scene. It’s a combination of the Diffuse Direct pass (light shining directly on the material) and Diffuse Indirect pass (light bouncing off another object and hitting the material).
If you manually combine the Direct and Indirect passes using the Linear Dodge (Add) blend mode, it will be the same as the Diffuse pass.
If you combine Direct, Indirect AND the regular Diffuse pass, it will double the overall diffuse contribution and will not look right, so pick either Diffuse or Direct/Indirect depending on what you want to do in post.
The Diffuse Filter pass only shows the color of the diffuse materials (no shading). It’s a utility pass, so it doesn’t factor into the normal beauty pass stack, but it can be combined in a more complex way to directly change the color of the diffuse materials. You can also get some interesting non-photoreal renders using this pass.
Denoised Diffuse Direct and Denoised Diffuse Indirect passes are available if you’re using the denoiser.

Reflection Passes
In the example above, The gold material is 100% metallic with RGB IOR to define the color. The blue material has the Transmission set to blue and the Specular set to white. The white material on the bottom has the Diffuse (Albedo) set to white, and the Specular set to blue.
Reflection passes are similar to Diffuse, where there’s a Direct & Indirect version that you can combine to get the standard Reflection Pass. Again, you’d either choose to use the direct/indirect passes separately, or the combined Reflection pass, but not both.
The Reflection Filter color only comes from the Specular channel. The specular in the blue glass is white, and the specular on the white plastic is blue, illustrating that the filter color is really all about the specular color.
Denoised Reflection Direct and Denoised Reflection Indirect passes are available if you’re using the denoiser.
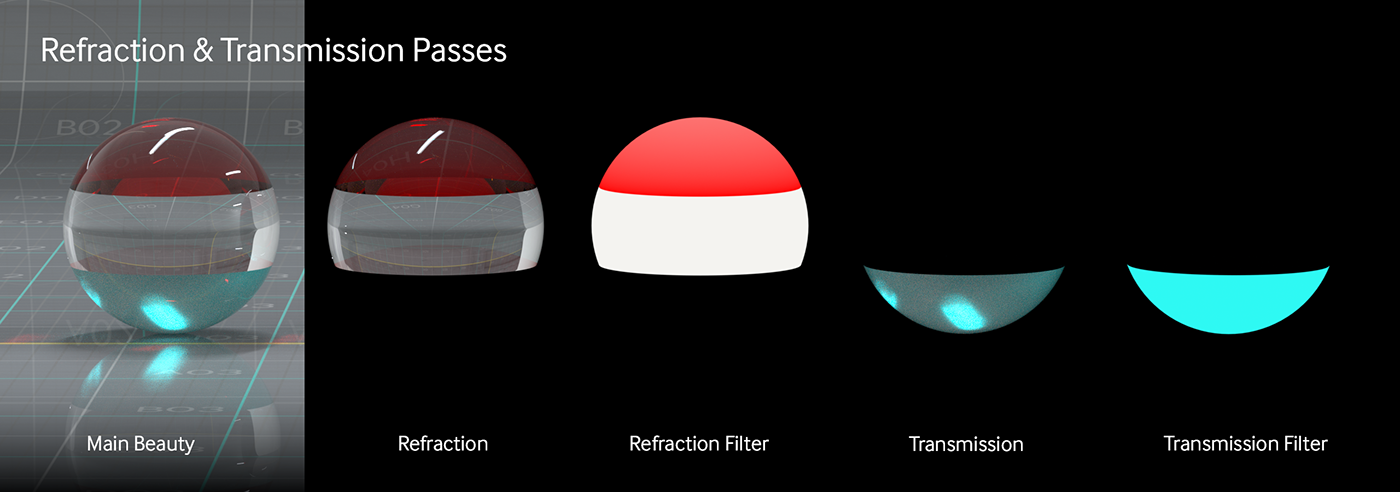
Reflection & Transmission Passes
In the example above, the top material has the Transmission type set to Thin Wall, and the transmission color is red. The middle material has Transmission type set to Specular, and the transmission color is white. The bottom material has the Transmission type set to Diffuse, and the transmission color is blue.
The Refraction pass shows the bits of the scene that you can see behind an object with a material applied that has Transmission set to Specular or Thin Wall. It shows the effects of the distortion caused by the IOR value and the transmission color. The Refraction Filter pass only shows the transmission color for specular or thin wall.
The Transmission pass shows Diffuse type transmission. The Transmission Filter pass shows only the color of the diffuse transmission.
The Denoised Remainder pass covers Transmission & Refraction if you’re using the denoiser.
Subsurface Scattering Pass
This just shows the Subsurface scattering portions of materials. Nothing special to point out here, just have the pass in if you’re using SSS (scattering or random walk mediums).
If you’re using the denoiser, the Denoised Remainder pass is where SSS will show up.

Emitters Pass
The Emitters pass shows the contribution of the Emission channel in your materials. The emitters pass renders out similar to a filter pass - it only shows the color and power of the emission on the material - it doesn’t also provide glow or secondary light. If your scene has emissive materials, you need this pass in your stack.
If you’re doing a stack of beauty passes, the secondary light the emitters produce will already be baked into the other passes (diffuse, reflection, SSS, etc).
Optionally, you can render out the Light Direct and/or Light Indirect AOVs (set to Layer ID=1 - more on this later in this guide) to use as utility passes to change the color or intensity of the secondary light in post if you want, but they aren’t necessary for a standard beauty pass stack, and will produce unexpected results if you combine lighting passes with your beauty passes.
The Bloom and glare produced by the emissive material is found on the Post Processing pass.
The Denoised Emitters Pass is available if you’re using the denoiser.

Environment Pass
If you have a scene where the HDRI is visible in the background, the Environment AOV is where it will go. The entire Environment renders on this pass, not taking into account any of your objects in the scene.
If you were to just combine your stack of passes as normal (using Linear Dodge - Add for the blend mode), the objects in your scene would be ghosted and blown out as seen above in the third panel.
A good way around this is to render a mask for all your foreground objects by using Render Layer or Cryptomatte (covered later in this guide) and then use that mask to knock out the section of the Environment AOV that the foreground objects overlap. You may have to invert the mask to get it to work properly, depending on how you set it up. The goal here is to black out any areas where you have objects in the scene so that the environment pass doesn’t affect them.
Now when all the other passes are combined (and there’s a solid black layer at the very bottom of the stack), the composited piece will look correct (see the 5th panel above).
The Shadow AOV isn’t necessary for a normal beauty render stack, but it can be used to enhance the shadows the objects cast. If you are using a visible HDRI backplate, the shadow AOV in combination with a shadow catcher material is what you’d use to fake the shadows on top of the HDRI backplate. A bit more about this can be found in this guide.
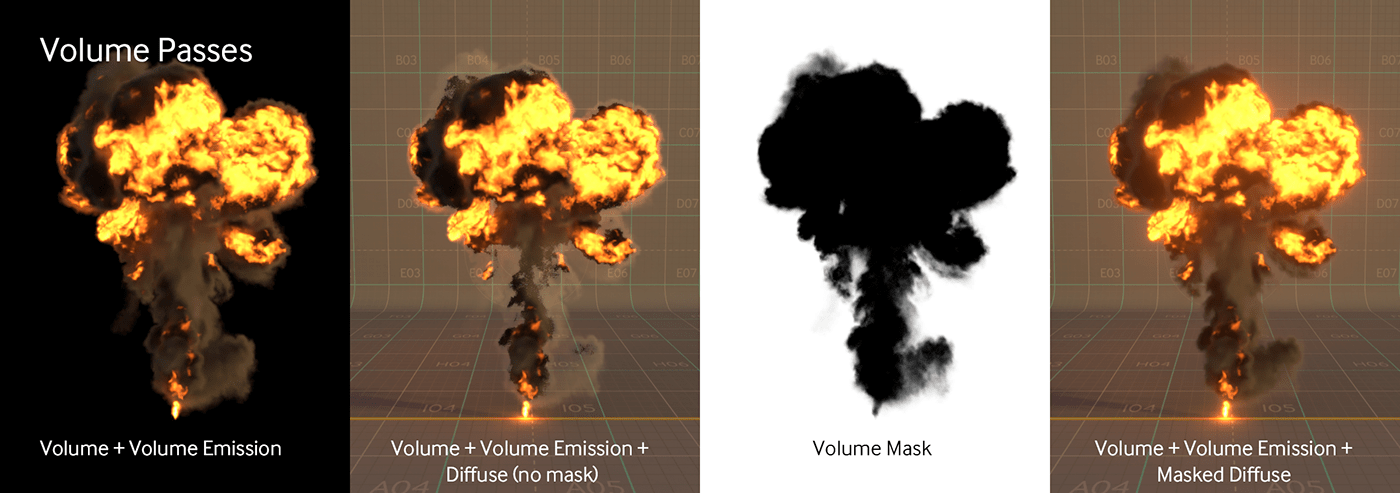
Volume Passes
Volume passes are in a separate bucket than Beauty-Surface passes. Add these into the mix if you have volumes in your scene.
The Volume Mask AOV is very important - Compositing a volume in without one will make it look ghosted and washed out (see panel 2 in the image above). Render out the Volume Mask AOV and mask all the other layers with it, and the volume will show up correctly (panel 4 in the image above).
There are also special AOVs just for getting the z-depth of volumes. That’s a bit out of scope for this guide, but just be aware that they exist in case you need them.
Post Processing
This is for bloom and glare if you’ve enabled them in your camera. This pass nearly always goes at the very top of your compositing stack unless you want something above it that’s not affected by post effects for some reason.
Important: The Post Processing AOV does NOT use an alpha channel. This means you can’t composite into an image where the final PNG is meant to have a transparent background.
Reconstructing Beauty Passes in Post
Once you’ve enabled every beauty pass that contributes to your scene, all of these passes will be combined using the Linear Dodge (Add) blend mode in your post processing comp. If they all go over a black background (or you leave the bottom-most layer at the Normal blend mode), it should look exactly the same as what you see in the flattened beauty pass in the Live Viewer.
The order in which you’d usually put the layers is:
1. Post Processing at the very top with the blend mode set to Linear Dodge (add)
2. Shadow AOV set to multiply (only if you need to use this pass to enhance shadows)
3. Reflection, refraction, transmission, sss, emitters, and diffuse, set to Linear Dodge (add). The order here doesn’t really matter.
4. If you have volumes in the scene, you’ll want to mask out all the other passes with the Volume Mask AOV.
5. If you have an Environment pass (visible HDRI) This goes below all the other passes, and you’ll want to create a mask using Cryptomatte or Render Layer to punch out the areas in the environment pass where other 3d objects in your scene overlap the environment.
6. At the very bottom of the stack, it’s a good idea to put a solid black layer to prevent portions of the other Linear Dodge layers that have nothing below them from washing out.
Lighting Passes
Lighting passes break the lighting in the scene up so that you have control over the intensity of individual lights in post.
A stack of AOVs that includes all of the various light contributions (sunlight, environmental light, emissive materials and physical lights like the area light) is a complete stack, meaning there’s no need to also use Diffuse, Reflection, or any of the other beauty passes. When combined, all of the lighting AOVs will form the final beauty render on their own.
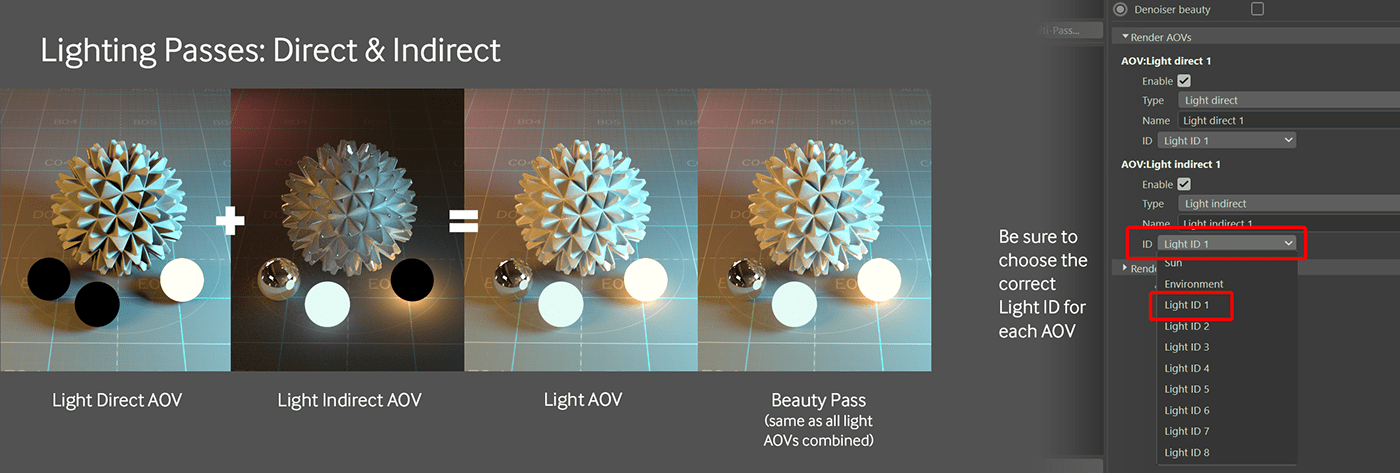
There are only three types of light passes: Light, Light Direct, and Light Indirect. Similar to some of the beauty passes, a Light Pass is the same as Light Direct + Light Indirect.
Usually you will want to either use the simplified Light pass, or get more granular control by combining a Direct and Indirect Light Pass for each Light Group. If you render out all three and combine them, the light intensity will be too bright.

For physical lights (area lights and such), you can specify a Light Pass ID on each to group them together (by putting multiple lights on the same ID) or separate them all out (by putting each light on its own ID). The Light Pass ID is located in the Octane Light tag that comes standard with an Octane light (see image above).
After you add a Light, Light Direct, or Light Indirect AOV, there’s an option to choose which Light ID you want this pass to cover. Make sure you add enough of these AOVs to cover all the Light IDs you assigned to your various lights, plus Sunlight for the Daylight & Planetary rigs, and Environment for HDRI lighting.

Environmental light (anything generated by an Octane Environment object) is automatically placed in the Environment lighting pass. Anything generated by an Octane Daylight Rig automatically goes on the Sun pass.
Light generated by Emissive materials is assigned to Light Pass ID 1. This is also the catch-all bucket for any physical lights that weren’t assigned different IDs. Note: you do not need an Emissive beauty pass if you’re doing a full lighting stack - all of that light is covered in the Light pass with ID=1.
All other physical lights are assignable to any Layer ID you want. Anything on ID 1 will show up in the same pass as emitters. If you assign two area lights to ID 2, that pass will include the light generated by the combination of those two lights.
If you’re using a light with a medium in it (like an Octane Spotlight), and assign that to its own Light Pass ID, the effects of the medium from that light (not the emission from the light) will appear in all lighting passes. Just something to be aware of if you’re using spots or adding scattering into your lights.
Reassembling Lighting Passes
Similar to Beauty passes, a simple lighting pass composite is pretty easy. Make sure you have passes enabled for every light you want on a different layer (Environment, Sun, every Light Pass ID you’ve used), and make sure if you have emissive materials in the scene you don’t set any of the light IDs in your lights to ID=1, assuming you want them separated.
Once all the passes are rendered, they’re combined in a post application using the Linear Dodge (Add) blend mode. Order doesn’t matter, but usually you’ll want the post processing AOV at the top. Either have the bottom-most layer be solid black or a lighting pass set to the Normal blend mode.
All lighting passes + the Post Processing pass (bloom & glare) should give the same result as the compiled beauty pass you see in the Live Viewer.
Object Masking Passes
Cryptomatte and Render Layer are used to separate out individual pieces or groups of geometry so they can be more easily edited in post.
Cryptomatte creates masks for the final render that are used to isolate all of the various objects for image correction in post (changing colors, adjusting brightness, etc).
Render Layer is more for isolating objects (and their shadows and reflections) so that you can do a full background replacement in post or export out a transparent PNG for web/app/presentation use.
Render Layer Masks (not to be confused with Render Layer) is the older, far slower way of doing what Cryptomatte does. This system has been replaced by Cryptomatte, but still exists for compatibility purposes with older files. Compared to cryptomatte, the generation of render layer masks is shockingly slow (sometimes doubling or tripling the render time) - It’s highly recommended that you update older projects to the Cryptomatte system if you need to reuse them. Render Layer Masks are supported in C4D’s standard EXR format, but not the EXR(Octane) format, and you’ll actually see the entire Render Layer Mask section disappear when you select EXR(Octane) from the Format dropdown, and reappear when you change it to EXR.
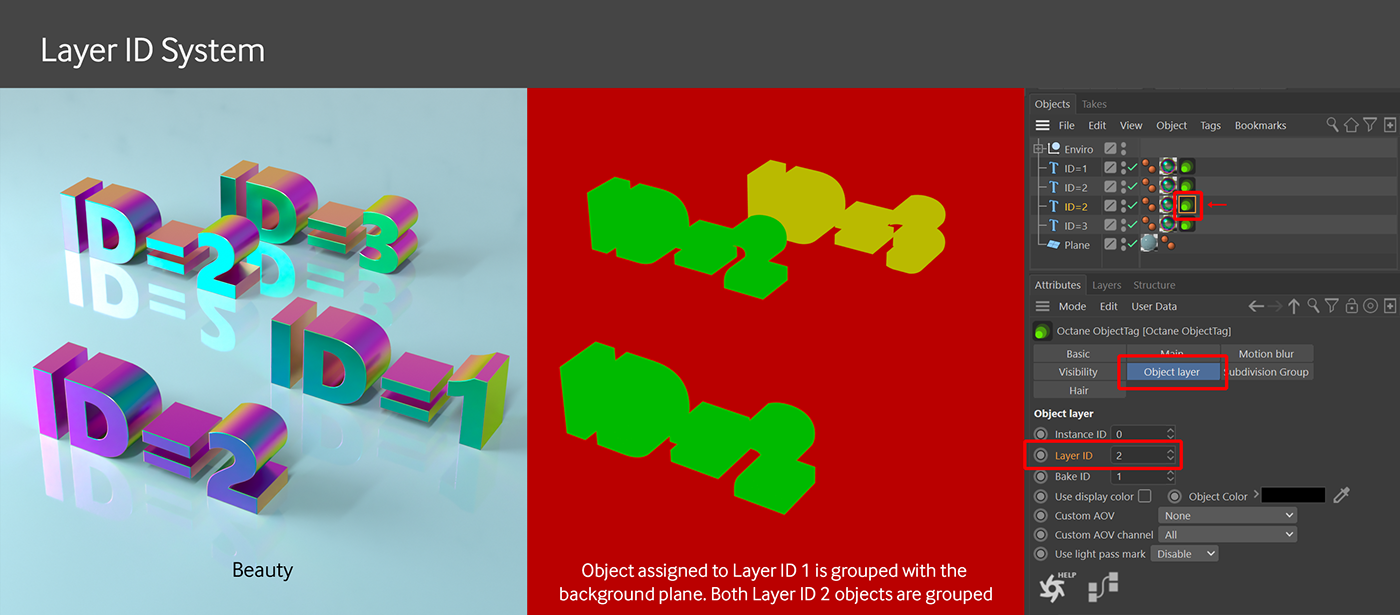
The Layer ID System
Both Cryptomatte and Render Layer make use of the Layer ID system to control the grouping of objects you want to mask or isolate.
The Octane Object tag is used to assign each object its own Layer ID, or assign the same Layer ID to several objects in order to group them without having to nest or reorganize them in the Object Manager.
There are several types of ID designations in the Object tag. The Layer ID in the Object Layer tab is what we’re focused on here, not the Mesh ID, Instance ID, or Bake ID.
Important: When assigning Layer IDs for separating objects, never use Layer ID 1. Anything on Layer 1 will be treated the same as the background and will not be broken out from the rest of the scene.
Cryptomatte
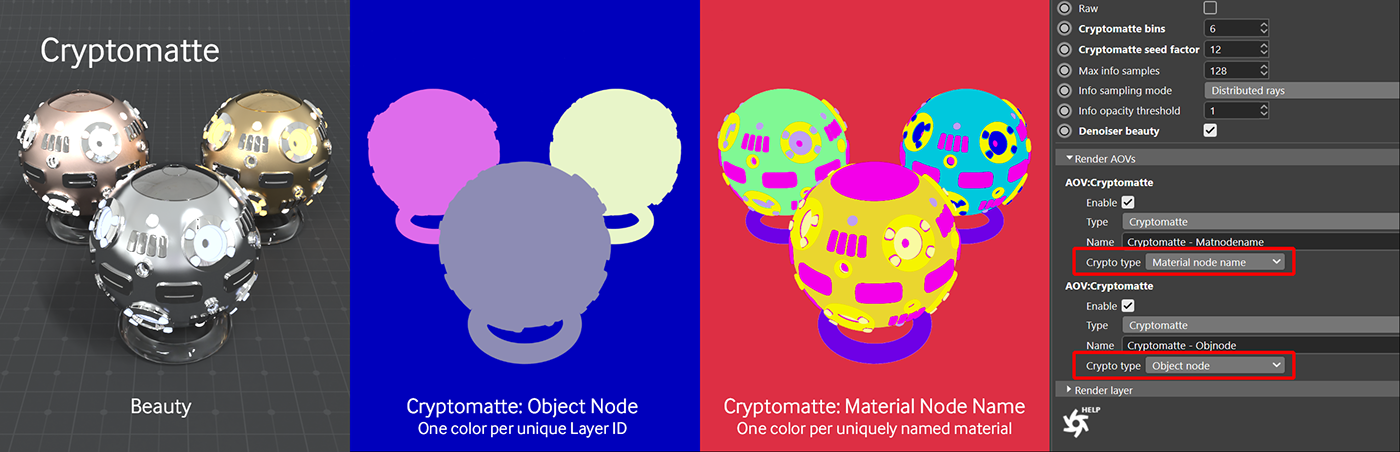
Cryptomatte creates a single pass with different colors that represent each piece of geometry or material in the scene. Post processing applications can then take this data and create individual masks for each of your objects or materials.
Cryptomatte has several key advantages over other systems, such as supporting motion blur, depth of field, and being able to break apart an unlimited number of objects without adding render time to the scene.
Octane for C4D currently supports two ways of assigning colors (different masks) to your objects. This is chosen in the Crypto type dropdown when you add the pass.
If you select the Object node (not object node name) type in the dropdown, you use the Layer ID system in Octane object tags to group objects together. Anything assigned the same Layer ID gets the same color in the cryptomatte.
The other option is to separate objects out by material. If you select the Material node name (not material node) type, each pixel in the scene that contains the same material will show up as the same color in the cryptomatte. For this to work, each Octane material that you want broken out must have a unique name.
The other Crypto types are for compatibility purposes with Octane Standalone/orbx files - they don’t currently work in the C4D Octane plugin, so don’t choose them.
Some post processing apps support cryptomatte natively, and some require a plugin. Photoshop for example needs a free plugin from https://www.exr-io.com/ to handle these masks properly (and EXR files in general). After Effects comes with a built-in effect to extract masks. It’s worth looking into the proper workflow for your particular post app.
Render Layer
Render layer is a good option if you want to do a full background replacement, reposition your objects in post, or create images with transparent backgrounds to be used on the web or in presentations. It not only allows you to isolate objects, but you can also create passes for the shadows and reflections for just those objects so you can composite them in your new background.

Render Layer Setup
Alpha channel MUST be enabled in the Octane render settings (in Kernel settings) for this to work.
At least one object in the scene must have an Octane Object tag and be set to a Layer ID other than 1.
Finally in the C4D Render Settings (not the Octane ones), in the Octane Renderer section, in the Render AOV group tab, at the bottom, Render Layer must be enabled, and the Layer ID of the object(s) you want to isolate needs to be set here. You can also add Render Layer AOVs the way you’d add any other AOV if you want to use them (shadows and reflections for your objects).
You can only render ONE Render Layer at a time (controlled by the Layer ID), and Octane will ONLY render what is on the active Render Layer. If you are using other passes (beauty, info, etc.), those passes will also only render for the active Render Layer.
If you want to automate rendering several Render Layers, you need to do this using the Takes system and set up a different C4D render setting for each Layer ID.
Shadows and Reflections that are the result of the objects on your render layer can be saved with the appropriate AOVs in the Render Layer section.

Render Layer Modes
The Render Layer section also has a few modes that you can select depending on what you want to do with your objects.
Normal Mode takes the rest of your scene into account. This means other objects will be reflected in the objects and affect the lighting of the active Render Layer. If anything that’s on another layer is obstructing objects that are on your active Render Layer, those portions of your Render Layer will not render and you’ll end up with “punched out” sections (see the graphic above).
Hide Inactive Layers will disregard all other objects in your scene and just take the lighting and environment into account. There won’t be any cut out portions of your main object due to obstructing objects, but there also won’t be any reflections or other effects from those other objects.
Hide from Camera takes the rest of the scene into account (other objects show up in reflections and affect lighting), but unlike Normal mode, regardless of whether other objects are obstructing objects on the Render Layer, it will not punch out portions of the render. This is probably the most useful mode.
Only Side Effects Won’t render the beauty pass at all - it will only create data for the Layer Shadows and Layer Reflection AOVs.
Render Layer AOVs
In addition to rendering out your object with Render Layer, you can also add special AOVs to get shadows and reflections that you can comp into your final scene.
Render Layer AOVs will only work if Render Layer is enabled and set up properly.
Render Layer AOVs are not denoised, so you may have to throw a lot more samples at them than you’re used to.
Render Layer AOVs are also affected by the modes above. Most notably, the Only Side Effects mode only works with these AOVs (it doesn’t return a beauty pass). If Normal mode is selected in the Render Layer section, the geometry on the Render Layer will obscure the shadows and reflections and the intersecting pixels will show up black in the reflection and shadow AOVs. If the Side Effects Only mode is selected, the reflections will appear fully, but the actual geometry won’t render (you’ll have to do another render for this in a different mode).
There are three Render Layer AOVs:

The Layer Reflections AOV produces a pass that contains only the reflection effects that the objects on the active Render Layer have on the other layers.
The layer reflection pass does not have an alpha channel and must be blended into your composition using the Linear Dodge (Add) blend mode.
Shadows are treated in two different ways, depending on the use case. Opaque objects only cast black shadows in Octane, so you can either use the Black Layer Shadows AOV or Layer Shadows AOV if you don’t have transmissive materials like glass in your scene.

The Black Layer Shadows AOV contains an alpha channel, so you can composite this in an app or website that doesn’t use blend modes.
If you have transmissive materials (glass, translucent plastic, etc), things get trickier. Light passes through these materials and produces “colored shadows”. The color that’s produced is already baked into the Layer Reflections AOV, but not the Black Layer Shadows AOV.
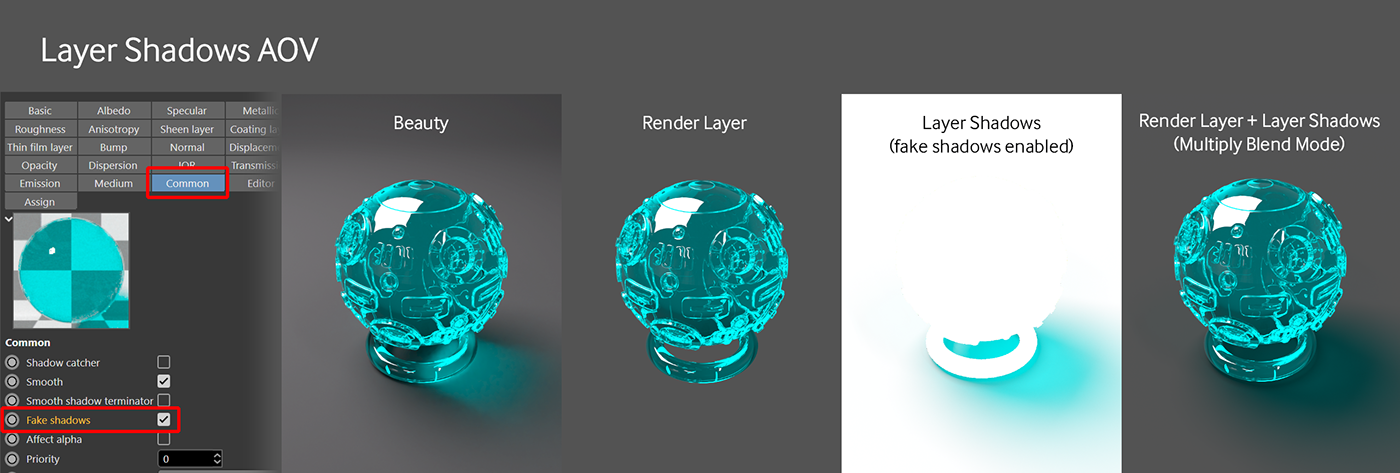
If you only want the colored shadow bits, but not the rest of the reflections or the caustics, you can use the Layer Shadows AOV. You need to turn on “Fake Shadows” in the Common section of the material to get this effect.
The Layer Shadows AOV contains both black and colored shadows, and requires a blend mode-capable post software to work.
Info Data & Utility Passes
These passes contain extra data for the objects in the scene. They’re useful for feeding information to the post processing application to make objects created in post appear to interact with the 3D render better. They’re also helpful for troubleshooting since they allow you to quickly have a look at the geometry wireframe, z-depth, normals, representations of the UVs, and a few other things that can point out problems.
All of these are covered in the manual. This guide will cover a few of the most common ones here just to show you what’s possible.
Shadow Pass & AOV Pass
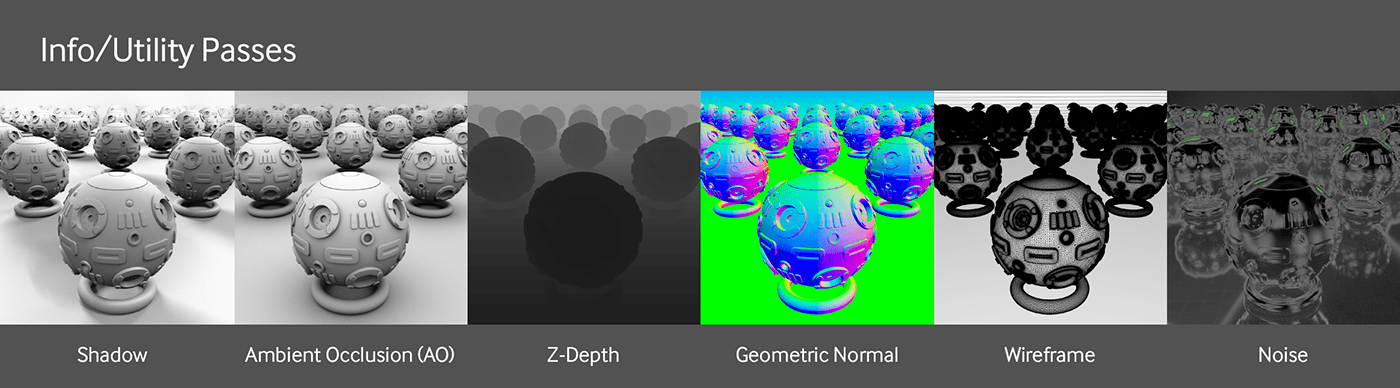
The Shadow pass (not the Layer Shadow pass) shows all of the first-bounce shadows created by the various lights in your scene. It’s similar to the Render Layer Shadow AOV pass, only for the whole scene, not just the active Render Layer.
The AO (Ambient Occlusion) pass shows the results of Ambient Occlusion (dirt in the creases of objects is a good way to think of this).
The data in both of these passes are already accounted for in beauty or lighting passes, so you’d use them if you wanted to enhance the shadow or AO effects. These two use the Multiply blend mode rather than Linear Dodge (Add).
Z-Depth
The z-depth pass is useful for doing depth of field or fog effects in post. It’s also handy for creating new objects in your post application and making them look like they’re part of the scene. There are separate passes for scene z-depth and volume z-depth.
Geometric Normals Pass
You can drag a bunch of super high polygon 3D models into your scene and then create a flat normal map out of it that you can apply to other models. You can see this particular pass in action in the Fun with Normal Maps guide.
Wireframe Pass
This shows the triangulated geometry that Octane uses. Great for those swiping shot breakdown videos you see on YouTube or the cover image of this guide.
Noise Pass
This shows hot spots for the noise in your scene - it’s very useful for fine-tuning adaptive sampling.
Specific Attribute Passes
There are a number of other info passes that visualize a specific attribute of the geometry, materials, lights, motion, and other aspects of the scene. There are both creative and practical uses for these, and a lot depends on what your post processing application can do. Once you get the basics down, it’s probably worth playing with some of these.
Custom AOVs
There are also Custom and Global texture AOVs that let you do some advanced material replacement and compositing effects. These are out of the scope of this particular guide.
Check out Part 1: Setup & the AOV System if you haven't read it yet, and there's also a checklist to help you remember all the various settings for each project.


