

Results 1 to 20 of 47
-
08-17-2016 #1
 Registered User
- Join Date
- Jan 2014
- Posts
- 35

1962 Mercury Comet with a 32V Cobra Engine
Last fall I started building a 1962 Mercury Comet. The theme was family cruiser with pro-touring/autocross capabilities. Having been an active member on a Mustang forum, I documented the entire build there. Then, almost a year later I remembered that this forum existed (sorry guys). I've been browsing this forum and realized there are some cool Falcon and Cougar builds going on, so I decided I should post this up here for you all to see.
I'm going to simply copy and paste my original posts from VMF into a thread here. So, here we go - a complete build in one night:
Here's the story. I recently finished building the 65 Mustang of my dreams. Full build thread here:
http://forums.vintage-mustang.com/bu...o-touring.html
And then we had our first child, and I realized that rear facing car seats consume a lot of space! So, I wanted to find a "quick" project that I could put together this winter and have for cruising around next summer. I'd also like to do road trips with it and go around some cones at Goodguys. My wife wanted a car with fins. So, late this summer I started searching for a 1962 or 1963 Ford Fairlane and Mercury Comet. Both have fins, would give us more space, and would be an easy chassis to modify with Mustang parts.
In late September I found this 1962 Mercury Comet Custom. It's an all original car with one repaint. It started out life in Hollywood, CA and ended up in Michigan in the late 90's.

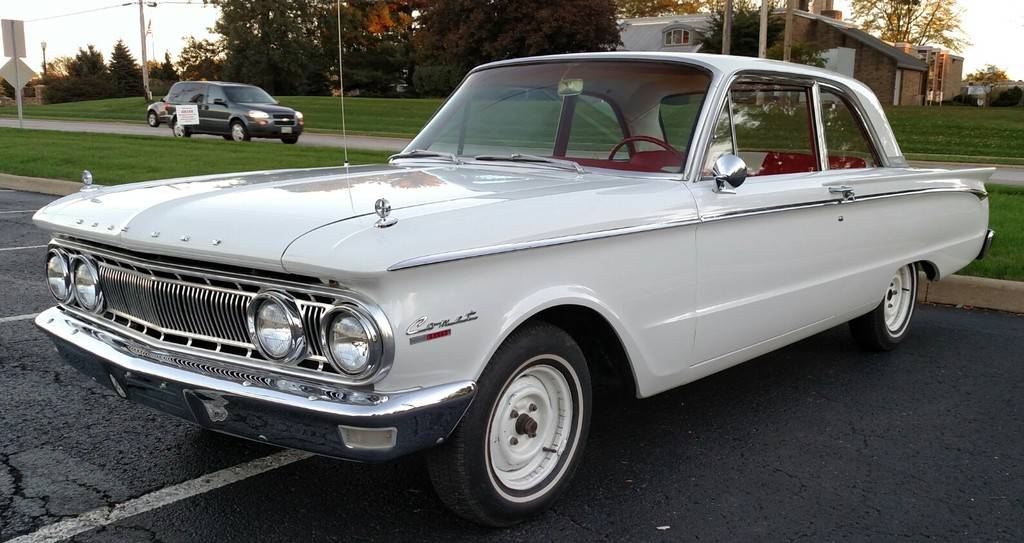


It's a killer start to my project because cosmetically it's almost perfect. It even has new chrome on the bumpers and the seats have been recovered.
We actually drove the car for about a month before I started tearing into it. To make that possible I added rear seat belt mounts:

Fits like a glove:

I had a Cobra engine and trans from a '96 that I parted out a year ago. They've been sitting in the corner of my garage waiting for this. 120k miles and probably never ever washed:
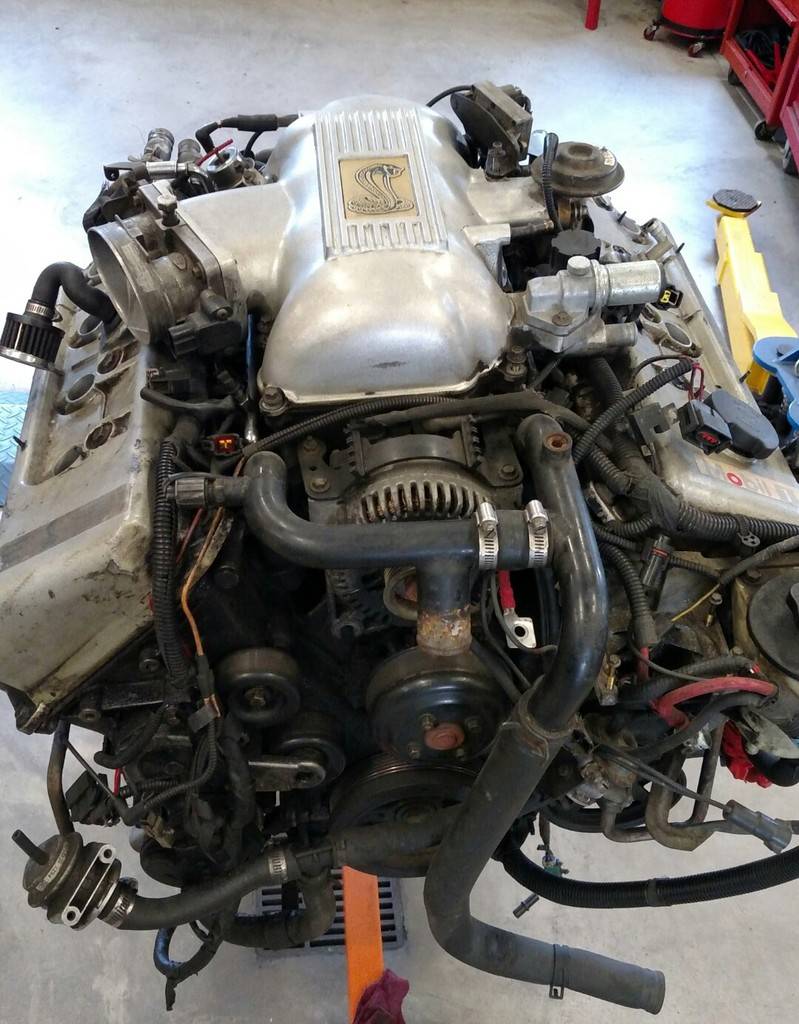

I pressure washed it a whole bunch before tearing it apart. I stripped it down to a short block. It was a good running motor, but I wanted to freshen it up with new gaskets and detail all the pieces.
Here's the short block cleaned up:

I stripped the heads down to the bare casting:


I re-assembled the heads with new Viton seals and clean valves that I hand lapped. I then had the heads skimmed. It took .004" of material to get them flat. I assembled the long block with new timing chains and guides:

The valve covers were stripped bare and coated with wrinkle paint:

The timing cover and all pulleys and brackets were sand blasted and painted with engine enamel. The intake is still the stock powder coating. It was in nice shape.

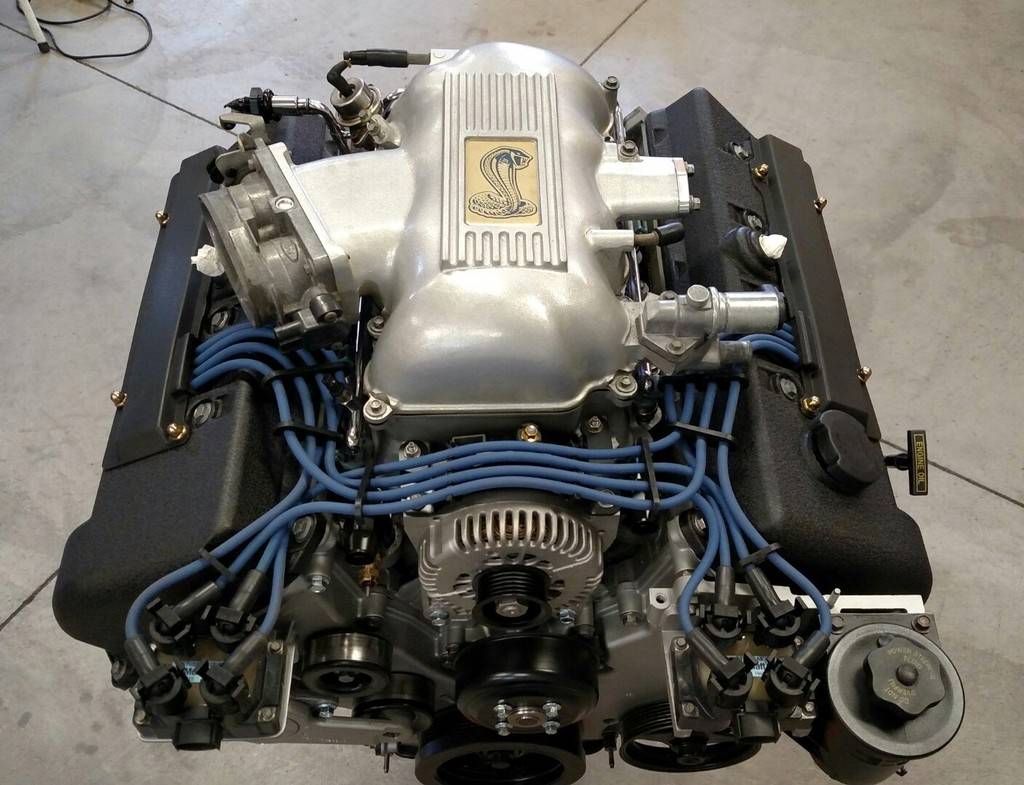


Stock exhaust manifolds were sand blasted and painted in VHT header paint. The EGR bungs are all capped.

I did a rear head cooling mod on this engine and I'm using On3's t'stat and cooling line mods in the front.
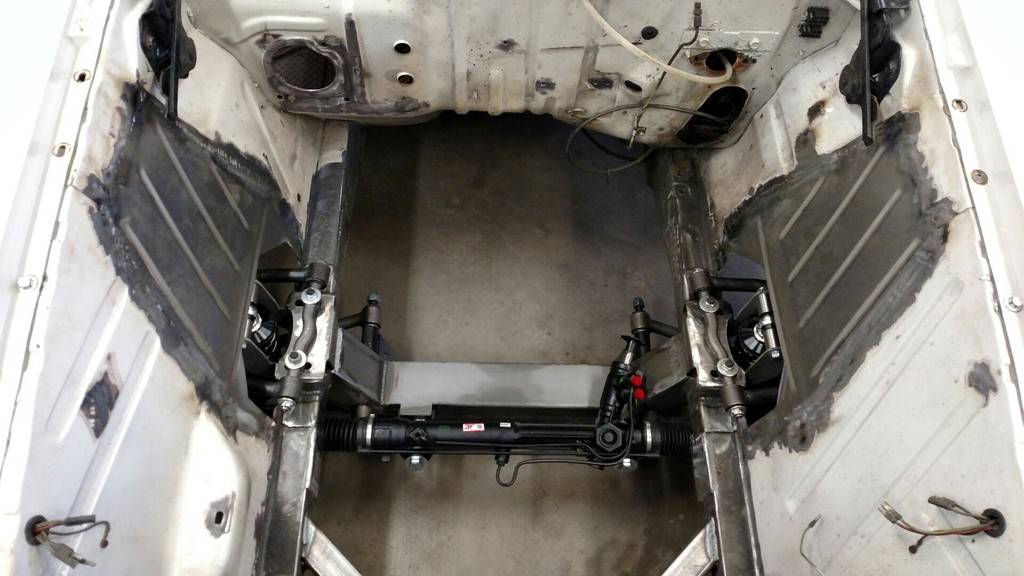
Okay, so I have an engine. Now it's time to make room for it. Before I did any cutting on the car I built a set of subframe connectors out of 2x2" box:


If you're wondering why the underside is a turquoise color, I learned that it's called "slop grey" and is a mix of grey and whatever color they had leftover that day....usually a shade of green. The Ford plant in New Jersey that built Falcons and Comets used this instead of red oxide.
And then I cut out the shock towers:

I bought a Welder Series MII cross member that's designed for coil overs. It's a universal kit and takes a lot of planning to make it happen. Here's how it starts off:

-
08-17-2016 #2
Registered User
- Join Date
- Jan 2014
- Posts
- 35
And with a little welding:


Here are some boxing plates welded in:

You have to determine your wheel center line and ride height, and then notch the cross member to fit the frame. Here are some pics showing the wheel in the car with 1 deg neg camber, 6 deg positive caster, and at ride height. These are 17x8 +35mm wheels. Not the style I'm using, but they are the size and backspacing I intend to use.


Some test fitting with things tacked in place:

Cross member welded in:


Here I'm fitting the sway bar. This is a 1" bar from R&C Motorsports.


And that's pretty much how it all sits right now. I'm 2.5 months into this project. Hoping to finish it up in early spring. Stay tuned.
08-17-2016 #3
Registered User
- Join Date
- Jan 2014
- Posts
- 35
I finished fitting my sway bar yesterday, along with some triangulation that replaced the strut rod brackets I cut out.


08-17-2016 #4
Registered User
- Join Date
- Jan 2014
- Posts
- 35
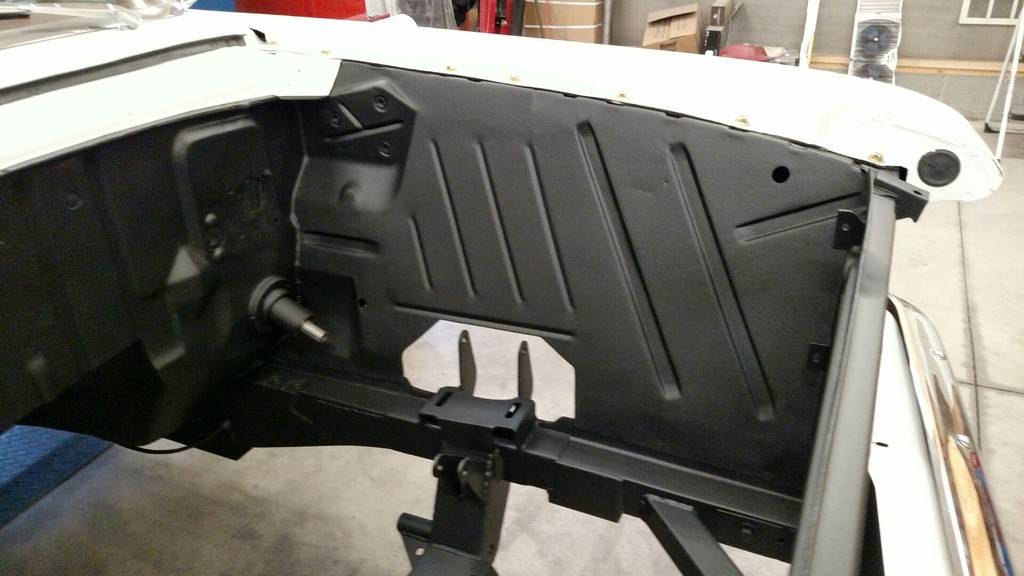
I've knocked out a few tasks in the past couple days. I opened up the core support for a bigger radiator opening. This is a 28" triple pass radiator that Summit sells as their own (the brand is actually Northern). I still need to roll the lip around the opening.


Then I welded in shock tower patches. These are sold by R&C Motorsports. I butt welded them in and ground it all smooth. I will eventually skim this with filler to clean up the grinding marks.

Lots of tacking so nothing warps.

After grinding. Note that I had to further open up the opening for the upper control arm. My coil over mounts are higher than the R&C kit by at least an inch. I did it this way to fit a taller spring and shock, which should equate to a better ride. Unfortunately it also means a bigger opening in the engine bay. I'm using a QA1 shock with a travel range from 10.25 to 14".

Finally, I took the time to box the underside of the cross member. The Welder Series kit intends for this area to be open, but I didn't like it.

And after a few minutes with my good friend, the grinder:

Next up is installing the suspension (again) so I can put weight on wheels. This will allow me to roll the car forward and install the engine!
08-17-2016 #5
Registered User
- Join Date
- Jan 2014
- Posts
- 35
I had a few hours in the garage this morning. Got weight on wheels again. It's been a month since this car rolled. I left the swaybar out so I'd have more room to weld in engine mounts. Here are a few pics:


- - - Updated - - -
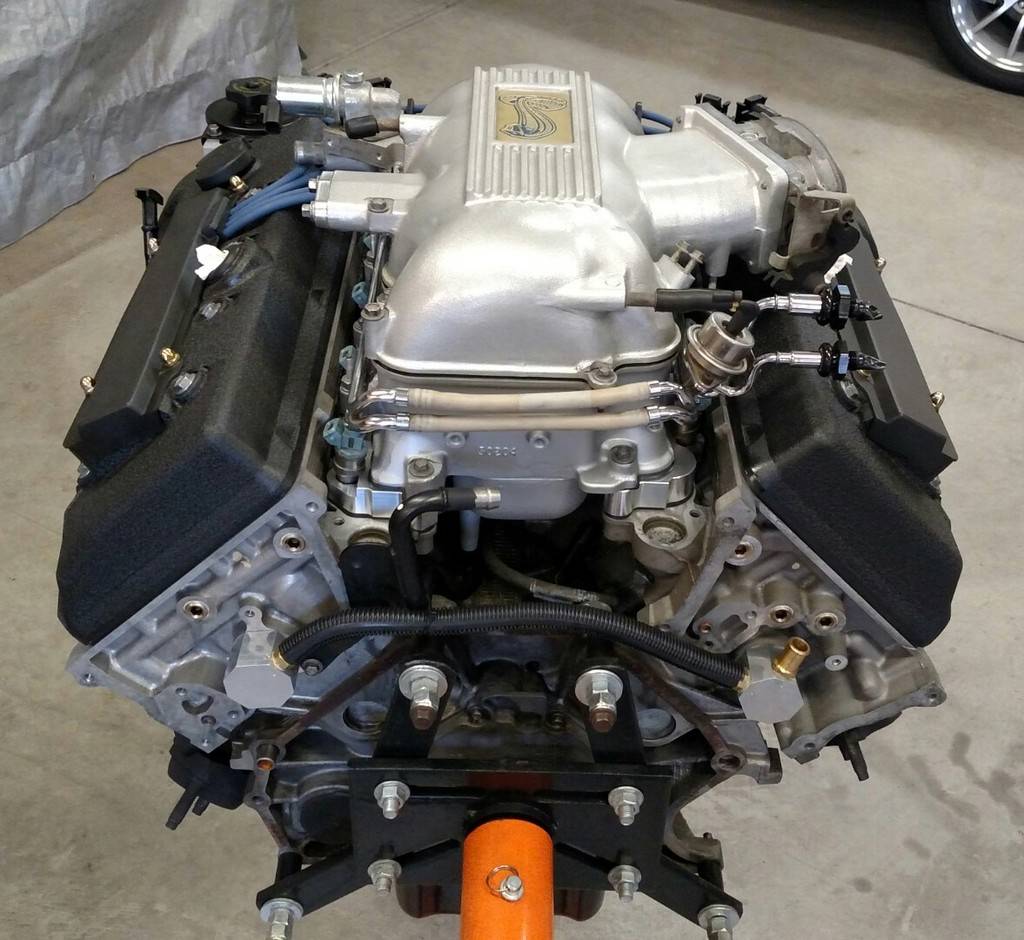
Over the past two days I've had a few hours to fit the engine. This has been in and out of the car three times. I had to notch the cross member for oil pan clearance. This is pretty similar to other aftermarket cross members designed for mod motors.
Much to my surprise most everything fits. I had to remove the oil filter and I need to buy an oil filter adapter that does not have an oil cooler so the filter will clear the frame rail. The heater fan should clear the valve cover and I'm hoping I can fit hydraboost. I'm hoping to figure that out this week. The hood appears to have at least a half inch of clearance at the tightest spot. Overall, I'm really happy with this.
The ride height is too low. I need to crank up my coil overs.


08-17-2016 #6
Registered User
- Join Date
- Jan 2014
- Posts
- 35
I've been working on a brake and clutch setup and finally have things figured out and ready to show off. Once you stuff a 4V mod motor in a Comet, there isn't much room for a brake booster. So, I decided to go with hydraboost because I wanted power brakes and I'm already running a steering pump for power steering.
Since I needed a clutch pedal, I wanted to make the late model clutch and brake pedals work in this car. Furthermore, since they are made for hydraboost, I figured it might be easy to throw it all in together. These particular parts can be found on any 96-04 V8 Mustang.
The 96-04 Mustangs use a cable clutch driven by a clutch quadrant that hangs off the passenger side of the pedal assembly. This interferes with a wiper motor on Mustangs or in my case a vacuum wiper assembly on a Comet. There was also no way I was getting a cable around this 4V head.
My solution was to cut the quadrant assembly off and weld on a tab facing down that I'm using to drive a master cylinder for a hydraulic clutch. I have exactly 1" of travel with this setup. I'm using a Howe Racing G3 1" bore master cylinder. It's the smallest package I could find. I will use a 7/8" bore Wilwood Pull style slave on the trans. It has a 1.375" stroke and I'll be using 1.3" of it with my master/slave combo, which is about perfect for a diaphragm clutch and late model clutch fork.
I cut the original pedal assembly in half and used the back half of it (column side) with the new pedal box. This ends up being a really stout combo when welded together.


Clutch Out:

Clutch In:


Also, to make this all work I had to shift the assembly away from the engine to clear the valve cover. So, my brake pedal passes by the column on the left side of it. Normally, the brake passes on the right. I heated and bent this pedal to go around the column. And then bent the clutch to keep the stock spacing.

- - - Updated - - -
Quick update. I have a go pedal now. This is a foxbody pedal with the length and angles altered to fit this car and have the correct throw for the cobra throttle body (1.5" of pull from idle to full throttle). I also mounted up the column and wheel for the first time and made up a steering shaft.


08-17-2016 #7
Registered User
- Join Date
- Jan 2014
- Posts
- 35
I've been working on installing the driveline over the past few weeks. Not to my surprise, the transmission was no where close to fitting. The Comet trans tunnel makes early Mustang tunnels look cavernous. So, I cut it out.

Here is the T45 trans installed using a 96 Cobra cross member. I actually cut the tabs off the Cobra mounting bracket and welded them to my subframe connectors. It was super easy.

On to the rear end. After a bunch of measuring I learned that a shortened Explorer rear end would be perfect for me. In case anyone doesn't know, the late 90's (I think 95-01) Explorer rear ends are offset to accommodate the 4x4 transfer case. One side is 3" longer than the other. So, if you cut down the left side and use a right side axle, you can make a pretty short rear end. Furthermore, these all come with 31 spline axles and disc brakes. Then, if you're careful with your selection, you can find a limited slip model in the gear ratio of your choice. In my case I chose a limited slip, 3.73 gear ratio and found one with 80k miles for $250. Then I bought a used right side axle for $50.
I decided to center my tube cut on the four link bracket that I was going to be adding. Therefore, the bracket would be bridging the welded joint.

I used angle aluminum to hold the tube true.

I bought an ebay special made in China four link suspension setup for an early Mustang. This is a copy of the Heidts four link kit. I basically bought it for the brackets, since it came with axle, panhard, and frame brackets. I took the frame brackets and cut them in half and then switched their intended sides since I am mounting inside the frame rail instead of outside the frame rail. In this picture I haven't finished welding int he brackets. They will be tied into the floor, too.

Here's a pic of the rear crossmember I made. It closely follows the trunk floor and barely clears the diff cover when the suspension is at full bump:

And here are a couple pics of the rear suspension finished up. When at ride height, the panhard bar is perfectly level. My shocks are mounted on a 14 deg angle, which is way better than the Heidts geometry. The control arms are threaded tubes using 3/4-16 LH/RH joints. At the rear end I'm using a QA1 sealed rod end for a full range of motion.


These are 17x8 wheels with a +30 offset. With a one side shortened Explorer rear, the spacing worked out perfect!


And a couple pics with the car on the ground. Ironically the front came up a little when I finally got the rear where I wanted it. So, I need to drop the front down a touch.


08-17-2016 #8
Registered User
- Join Date
- Jan 2014
- Posts
- 35
The leaf spring hanger is not part of the torque box on a Comet, so I busted out the spot welds and removed it. I had a leftover rocker panel from a mustang project and cut two sections out of it to make a swept filler piece that filled the dead spot I had. I thought it looked appropriate.
After that, I stripped the back half of the car to bare metal and then brushed on a coat of epoxy, seam sealed, brushed a second coat, and then sprayed bed liner over all of it. The bed liner worked great to hide the brush strokes.
I did not strip the wheel wells. The undercoating on them was THICK and the rest of the car is so solid that I'm not concerned about what's under there.


Then I painted the rear end and control arms and assembled it all.

And, finally, I committed to wheels. These are 03 Mach 1 replica in factory size, 17x8, +30 offset.


08-17-2016 #9
Registered User
- Join Date
- Jan 2014
- Posts
- 35
I didn't get much time to work on things this weekend, buy I managed to tie up a few loose ends in the engine bay before the engine comes out for paint. First I mounted the radiator and electric fans. Then I made my upper coolant lines and positioned the t'stat housing. This is an On3 t'stat housing along with fittings I selected.


Then I made an intake tube and welded a tab onto the coil bracket to keep the filter from hitting anything.


Now it's time to tear it all back apart for paint.
08-17-2016 #10
Registered User
- Join Date
- Jan 2014
- Posts
- 35
I finished stripping the underside of the car:

Then I finished the trans tunnel:

And then I used the same process I used on the back of the car. One coat of brushed on epoxy followed by seam sealer. Let that dry overnight, put down a second coat of epoxy and then Duplicolor bed coating. Here's after the seam sealer:


And the final product:


Now I need to do the front clip!
08-17-2016 #11
Registered User
- Join Date
- Jan 2014
- Posts
- 35
It's been a few weeks but I finally have an update. I finished the body work in the engine bay and the put down more epoxy and bed coating. This time I used a spray gun and sprayed the epoxy. I used a 1.8 tip and low pressure to minimize over spray. Two coats of epoxy followed by three coats of bed coating.
Here is a pic after I finished body work.

Here is a pic after epoxy. It was still wet when I took this.

And some shots with it all finished.


The only thing left to paint is the inside of the floor, and that should go fast!
08-17-2016 #12
Registered User
- Join Date
- Jan 2014
- Posts
- 35
The car rolls again. A few weeks ago I painted control arms and clear coated my steering components. Today I installed it all.


I also took the time to do my alignment. Having coilovers makes it so easy. Before installing the coilovers, I set my ride height with adjustable jack stands under each lower control arm. Then I set caster, camber, toe, and took a measurement from the wheel lip to the fender lip. I will adjust the coilovers as needed to make sure this reference dimension is achieved. The alignment specs I used are 1.25 deg negative camber, 8 degrees positive caster, and toe neutral.

08-17-2016 #13
Registered User
- Join Date
- Jan 2014
- Posts
- 35
I finished up the last of my epoxy work today. The inside of the car got two coats of epoxy with seam sealer between coats.


I reinstalled the hood latch and all four head light assemblies. All of these components got a fresh coat of satin black.

And one more pic to post. I had to change oil on my wife's car, so I pushed the Comet into the front garage. I realized that this was the first time the Mustang and Comet were side by side.

I'm looking forward to taking some pictures of the Comet completed next to the Mustang. I sure do like both of these cars!
08-17-2016 #14
Registered User
- Join Date
- Jan 2014
- Posts
- 35
I didn't get a lot done on the Comet this week. My two accomplishments were sound deadener and head light/grill assembly.
First, the sound deadener. This is my favorite stuff. Peel n Seal from Lowe's. I used 5 rolls.


And then some work up front got me this:

The head light assemblies, trim rings, and grill are a pain to assemble. It took a lot of fitting to get to that point.
08-17-2016 #15
Registered User
- Join Date
- Jan 2014
- Posts
- 35
This week I worked on putting the interior back together. First up were new door panels. I bought these off an eBay seller that specializes in Falcon, Comet, and Fairlane stuff. Here's a pic with the new door panel installed and the old panel for reference.

I also put 64.5 Mustang door handles and window cranks on it.

Before I could finish the back seat area I had to run some wires. On the driver's side I added wiring that will turn on my fuel pump, and I put the original taillight wiring in a new run of loom.

On the passenger side I ran a 1 gauge battery cable and also some speaker wire for speakers I plan to install in the rear deck.

Here are a couple pics showing how I terminate battery cable. The is crimped with a big crimper:

And then covered with adhesive lined shrink tubing:

Here is the back seat installed:

And the front seat back in:

I still need to pull glass and replace the headliner, but at this point I've decided I'm going to get the car running first.
- - - Updated - - -
I got some time today to run brake lines. I was hustling. Ran all the lines in 3.5 hours. This was my first time using copper nickel line. I'll never use anything else. Everything double flared and tight. I plan to bleed it tomorrow. Fingers crossed.


08-17-2016 #16
Registered User
- Join Date
- Jan 2014
- Posts
- 35
Yesterday I bled the brakes. That went well. No leaks and a really good pedal. After that I continued being a plumber and did fuel lines. This is all 3/8" aluminum. For the engine connection and fuel filter connection I used tube nuts and flared the line 37 degrees. At the tank, it had a 3/8" feed and 5/16" return, both with bulged ends for hose and a clamp. So I used my double flaring tool on feed side to bulge the aluminum line and on the return side I flared the 3/8" line and used a barbed adapter. Then some 3/8" and 5/16" fuel injection hose and fuel injection hose clamps to finish it off (the return side wasn't clamped in the pic).


08-17-2016 #17
Registered User
- Join Date
- Jan 2014
- Posts
- 35
I'm definitely getting close to having this car running. This is probably my last update before I try to fire it up.
I've been doing a lot of wiring. Here's the stock 96 Cobra EEC harness:

It's basically two halves. Everything on the right hangs over the engine. Everything on the left runs from computer to relays, engine, MAF, O2s, etc. First thing I did was remove EGR stuff from the engine side and do a general clean up:

Then I worked on all the wiring I needed to have in the engine bay. battery hookup, headlight relays, cooling fan relays, EEC relays, fuse box:

Once I was good with all that I dropped in the engine and trans for hopefully the last time. I also hooked up the radiator and made high pressure lines for the hydraboost and power steering:


It might look tight around the booster and master cylinder, but I was able to drop the engine in around it. That made me happy.
Last thing I did this weekend was hook up my hydraulic clutch. This is a Wilwood pull slave. I cut up an old clutch cable to make this grommet:

I have this thing turned around from normal use. It normally mounts to a hard point with the end I have on the clutch fork and then the other end of the body gets pulled and pulls on a fork. I saw someone on a late model Thunderbird forum use this slave this way and I thought it was very clever.

With my 1" clutch master cylinder and current clutch travel, I get 1.2" of travel at the slave. I can feel the clutch disengage and I can spin the trans output shaft by hand, so hopefully that's enough.
08-17-2016 #18
Registered User
- Join Date
- Jan 2014
- Posts
- 35
I am excited to report that I have a running and driving car again. I've finished a few projects since my last post, so I'll start by posting my exhaust pics.
I bought an off road x-pipe for a 96-98 Cobra since it had the correct flanges for my manifolds. It was too wide. Both sides hit the frame rails coming out of the manifolds, so I had to cut and change the angle. Then I had to cut and shorten because this x-pipe would have been on the ground.
I added a set of metal core high flow cats. I am tired of smelling like exhaust when I drive to work in my Mustang, and I didn't want my kid smelling like exhaust, so this car got cats. I finished up the system with some Dynomax turbo mufflers and turn down tips. FYI for those running dumps: if you angle the turn down out instead of down, it really cuts down on noise in the cabin.


I finished engine wiring. The body side of the Cobra harness needed a lot of clean up. It ended up looking like this. The loose wires are for the data link connector and fuel pump circuit. When I took this picture I wasn't sure where in the car I was going to put them.

Here are some shots of the engine bay with wiring and plumbing complete. I'm running a catch can with -10 line instead of a PCV system.


And here are a couple shots to show it out in the sun for the first time in seven months.


I put about 50 miles on it this weekend to go along with about a half dozen heat cycles. So far, so good. I have a lot of clean up work to do under the dash and I need to paint the underside of the hood before putting it back on. Still need to do glass seals and a headliner, too. So, it's not done, but at least I can drive it and enjoy it while I do finish work as time permits.
08-17-2016 #19
Registered User
- Join Date
- Jan 2014
- Posts
- 35
I finally got around to painting the underside of the hood and installed it. I'm not sure what happened to this hood, but at every glue spot between the structure and skin, the skin was low. It's like the entire under side structure was tweaked down and it was pulling down on the skin. So, I cut all the glue joints and the hood popped back to normal. Then reglued and painted.

We took the car to my wife's grandparents for a visit. Her grandpa has been following this project since I started it, so he was really excited to see it in his driveway. We both took some pictures.


After the pics I took grandpa for a ride. He was impressed with the giddy up this old Comet has
08-17-2016 #20
Registered User
- Join Date
- Jan 2014
- Posts
- 35
I've been driving this Comet for a few months now. I probably have 1500 miles on it and I'm loving every one of them. I'm still tackling small projects on it as time permits. Here's one I just finished up - a center console.
I mocked this up out of cardboard and then built it out of MDF:

Covered it in 1/2" thick foam (sorry about the poor pic):

And the covered it in red vinyl that matches the dash pad pretty much perfectly:

And some pics installed. The interior is basically finished up at this point:


FYI - the cup holders are stainless steel inserts with a padded bottom in a standard size for a boat. Two for $12 on ebay, shipped. The audio jack you see ties into my Retrosound deck and allows me to plug in my phone for MP3s.
- - - Updated - - -
Took the ol' Mercury to Columbus this weekend for the Goodguys Nationals. I autocrossed it on Saturday. Here are a few pics and a video from the event.


https://m.youtube.com/watch?v=JaBi1v...m-upload_owner
The car handles really well. Much better than my Mustang, actually. It got a lot of attention at the show and was a blast to drive. Great weekend!
- - - Updated - - -
After autocrossing at Goodguys I got the bug to make this car a little better. It just had too much body roll to compete on the track (I was middle of the pack at this event). I was also lacking a true performance tire.
So, I picked up a set of the new Firehawk Indy 500 tires, which are rebadged Bridgestone RE003's for the US.

Then I spent a fair amount of time adjusting shocks. Turns out I was way underdamped. Once I got those close I was to the point where the car had just a little understeer in it. I tried swapping rear springs from 250 to 300 lb/in springs, but that made for way too harsh a ride on the street and also threw off the front to rear ride frequency ratio so the car was "bucking" really bad over bumps.
Back to the 250 springs I went along with a search for a universal rear sway bar kit. Welder series has a pretty nice kit with a 3/4" solid bar that is splined and has adjustable arms. It has a lot of different mounting options. I went with the least invasive mounting, which was to keep the bar low and use brackets that allowed me to bolt it on. So, the only welding on the car was for the tabs that mount the vertical links.
This mounting option puts the bar really low, but it's also centered under the wheel so it will follow the wheel with bumps. However, I can no longer straddle roadkill.


With the link in the middle hole, I get just a little bit of oversteer now. I've only been screwing around in parking lots and secluded roads, but it feels very good. I think the adjustability I have is going to be perfect.
I also get a chuckle looking under the back of the car. More bars and heim joints is just what I needed back there. At first glance the car appears very stock and I get a lot of comments where people have assumed it basically is stock. Then there are those that actually look closer


 Reply With Quote


