In 2002 Apple released the successor to their all-in-one computer, the iMac G3. Originally named the “New iMac” the PC would eventually be known as the iMac G4. The iMac G4 was extremely futuristic looking for it’s time with the entire motherboard and other components being housed inside a dome case. Coming out of the top of this dome was an adjustable metal arm and a TFT active matrix LCD screen with a native resolution of 1024 x 768. This was still a era of large heavy CRT monitors and seeing an LCD still felt pretty futuristic. In today’s article we will be looking at the 800MHz model which is the second of the four revisions Apple made of the iMac G4.
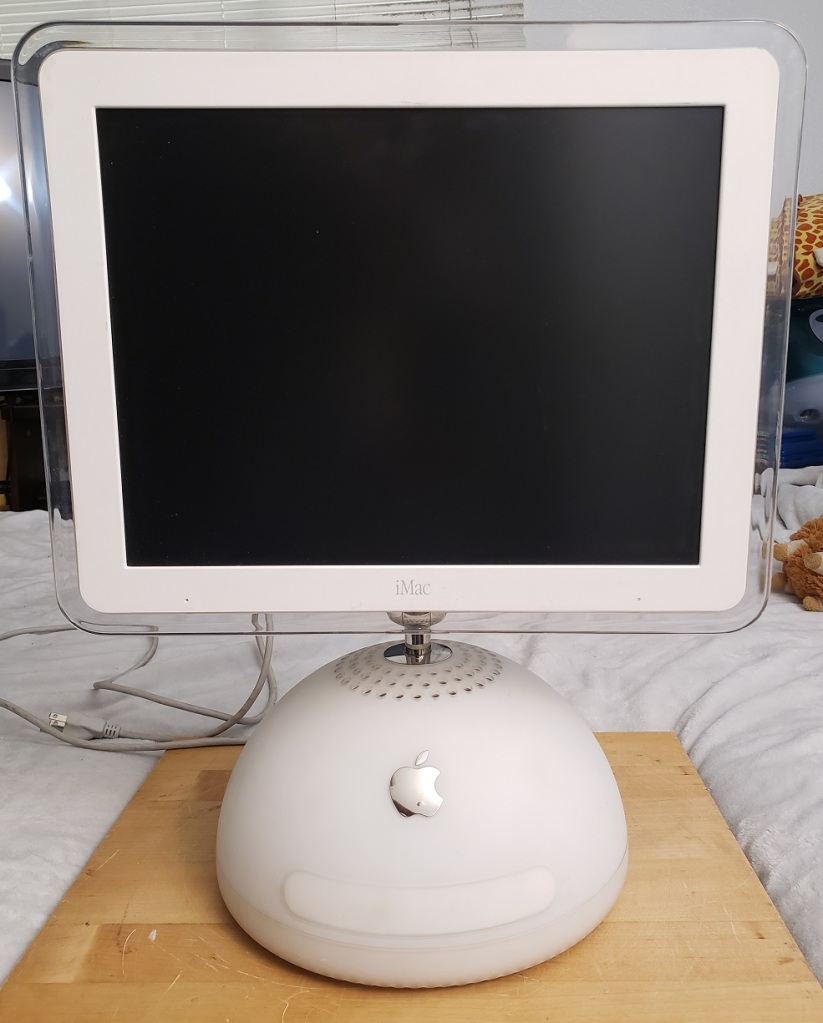
Even if your not an Apple fan you have to appreciate the industrial design and ability to fit everything into a small 10.6″ dome case. Even in 2019 as I write this article the iMac G4 wouldn’t look out of place on a sci-fi TV series taking place in the future home or on a starship.
Of course there is a price for this compactness and design and I’m not talking the dollar amount Apple wanted for one. I’m talking about expandability which is obviously severely lacking with the G4.
The front of the dome has no visible buttons or LEDs, just a shiny Apple logo and a slot for the optical drive. The optical drive in my model is a CD-R / DVD combo drive but the drive did vary by model.


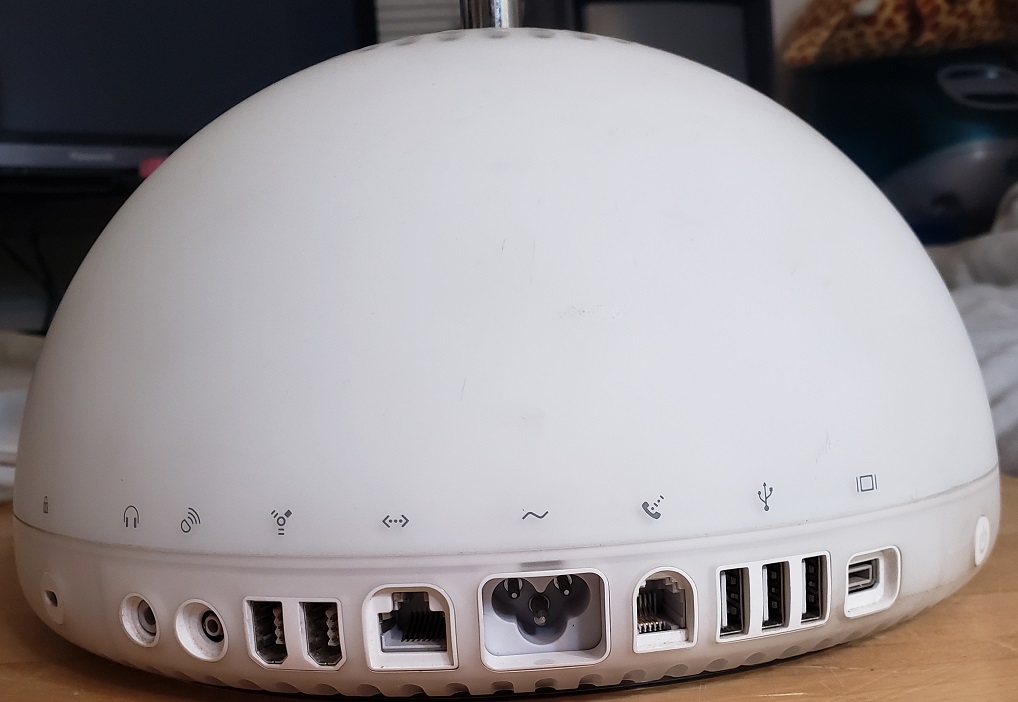
On the back of the dome we have an array of different connections for connecting your G4 to the internet as well as other peripherals.
All the way, barely visible, on the left side we have a Kensington security lock for securing your iMac to some object so whomever doesn’t walk away with it. Next to this we have a standard 3.5mm headphone jack. The next jack looks to be another standard 3.5mm audio jack but it is not. This is actually a special audio jack for a set of Apple Pro speakers. The jack is a little smaller then a standard 3.5mm jack and it also delivers power to the speakers. I unfortunately do not have a pair of these speakers but many consider them some of the best speakers ever made for any Mac computer. Following this we have two firewire 400 ports and an Ethernet jack. In the center we have a three pin power connector followed by a modem, three USB 1.1 ports and finally a mini VGA output port. The port supposedly only mirrors the main display but still handy if your having issues with the built in monitor.

To access the internals of the iMac there are four small screws on the underside of the base.

Removing the metal base plate gives access to the airport wireless card, or if you don’t have one, the port to install it. To the right is a 144-pin SO-DIMM RAM slot. This RAM is the smaller style SDRAM more commonly found in things like laptops. This slot will accept up to a 512MB stick of PC133 memory which is what I have currently installed. The iMac G4 can accept up to 1GB or RAM total but the second RAM slot is not as easily accessible. Later versions used DDR memory and had a maximum limit of 2GB..
After removing several more screws on the base of the G4 you need to carefully pry the two pieces apart. Even with the screws removed it may take some effort as there should be thermal paste still bonding the two haves of the case together.
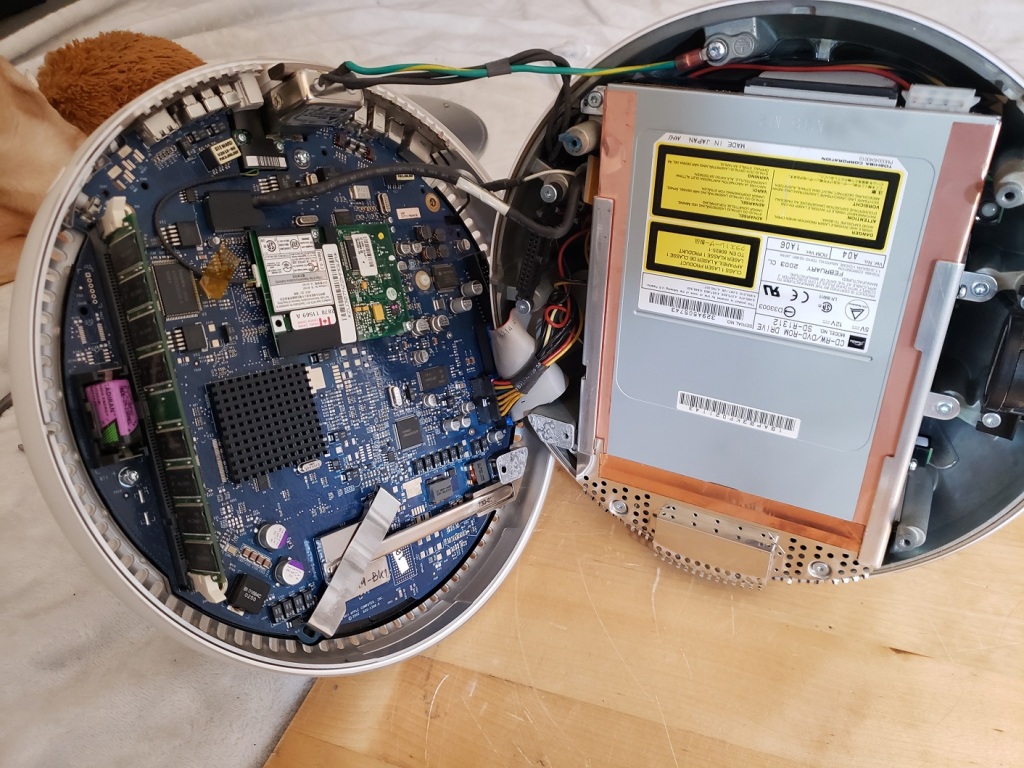
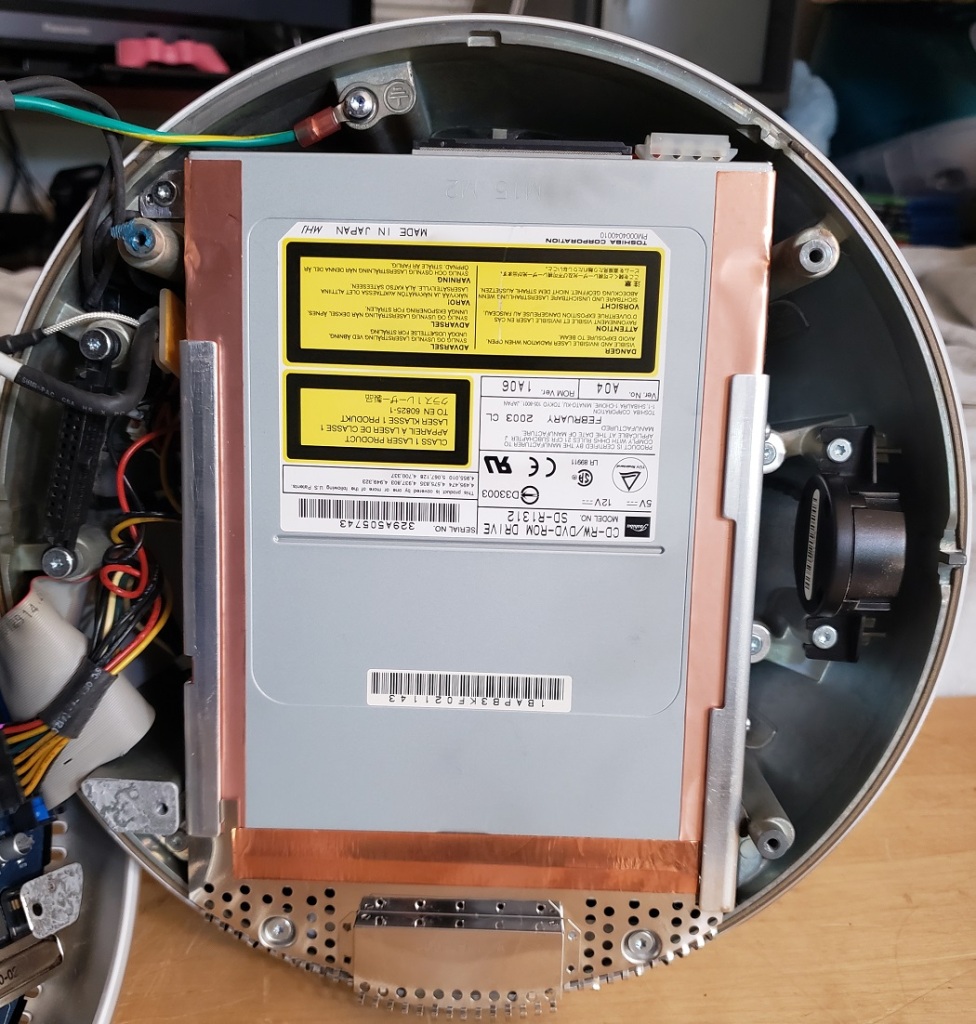
Here are the two halves separated. The upper half houses a fan and speaker as well as both the CD/DVD drive and hard drive above that. My 800MHz G4 came with the stock 5400RPM 60GB hard drive and OS X 10.4.11 installed. This hard drive can be upgraded to a larger size and can even be replaced with an SSD (via an adapter) if so desired.

Now lets take a look at the interesting part, the motherboard attached to the base of the g4.
1) CPU – My model features an 800MHz Power PC G4 but earlier models featured a 700MHz CPU. Later models went all the way up to 1.25GHz. There is no fan on the CPU but the heat sink is interesting on these models as it attaches to the side and makes contact with the upper half via thermal paste to use the entire case as a heat sink. This heat sink is more significant on the faster models. A metal clip holds the sink firm against the CPU but can easily be removed with the help of something like a flat head screwdriver and a bit of force though be careful not to gouge the motherboard or slip.

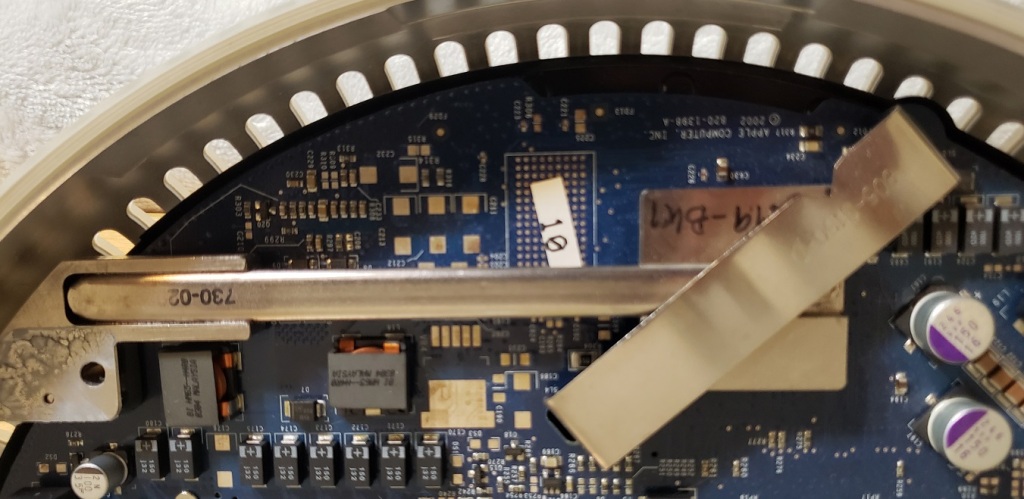

I do tend to like the Power PC chips and the 800MHz is sufficiently powered for the time though of course you’ll get more gaming mileage from a 1 or 1.25GHz model.
2) RAM – The second RAM slot is located on the upper half of the motherboard and uses a standard 168 pin DIMM slot. The slot on mine is also populated with a 512MB PC133 stick bringing my G4s memory up to the 1GB limit. I do understand Apple was working with space limitations and had to be creative to fit everything but it is an annoyance that one can only easily access half of the RAM sockets for upgrading without taking the computer apart. The difference in form factor could also potentially confuse less tech savoy consumers looking to upgrade their iMac G4s memory.

3) Video – I did not remove the small passive black heat sink to confirm but I’m almost 100 percent certain that lying underneath is the iMac’s Geforce 2 MX video chip. This model as well as the earlier iMac G4 also used this chip along with 32MB of non-upgradable video memory. Later models used the Geforce 4 MX chip as well as FX 5200 Ultra chips along with more memory. The Geforce 2 MX in the 800MHz here was not a high end or enthusiast oriented card but was a sort of cut down Geforce GTS with performance numbers a little higher in general then the older Geforce256. It did run cool and featured some advanced features for the time such as T&L (Transform and Lighting) capabilities making it a good choice for a non gaming oriented all in one machines like the iMac G4.

Next to the GPU chip we also have a small daughterboard like card. I believe this card has chips controlling the wireless and networking functions of the iMac.
4) Battery – This is the typical PRAM battery found ubiquitously in older Macintosh PCs. It’s always a good idea to change this battery when picking up an old Mac.
5) Various connectors
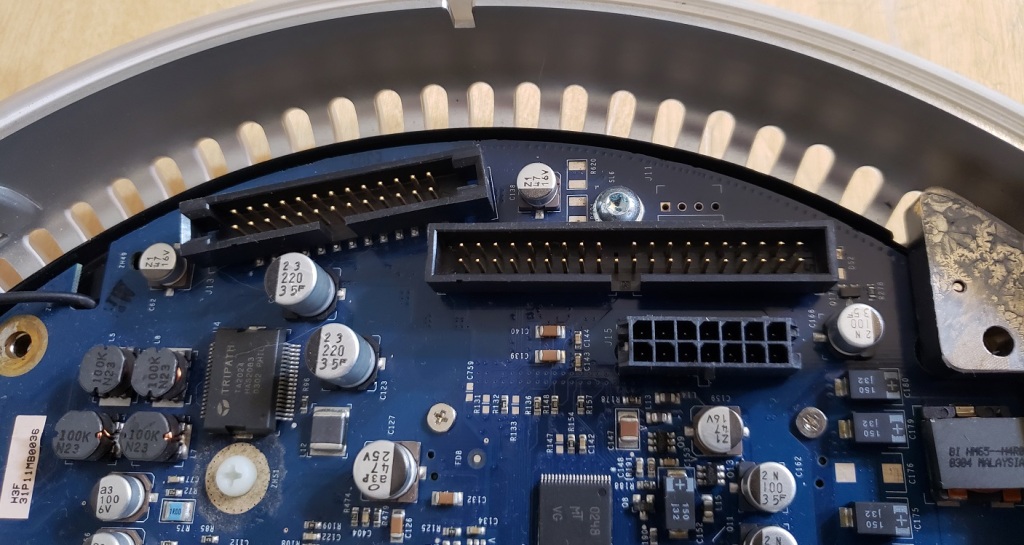
Above where the heat sink arm meets the upper case we have three connectors for interfacing with the upper half of the iMac. The smallest connector on the lower right is a power connector while the one above it is a standard ATA-66 IDE connector for interfacing with the CD/DVD and hard drive. The last connector strongly resembles a floppy drive connector but it is not. I believe this is just the interface between the monitor and the motherboard video and connects with a female connector on the upper half of the case.

The iMac G4 is a very futuristic design that even in 2019 I feel would fit in on the set of Star Trek or some other sci-fi production. As an everyday PC in its time it probably made a half decent space saving and fashionable family computer for tasks such as surfing the web and doing things like homework. As a gaming computer for a retro gamer though I find it very limited. The CPU is adequate but the Geforce MX is more suited for older 90’s games rather then early 2000’s mac titles. The RAM is a bit annoying to upgrade requiring you to open the case and upgrading in general is very limited. Unless your very short on space, only looking to play older 90’s Macintosh games or just love the stylish futuristic look of the iMac G4 your much better off with any of the Macintosh G4 towers such as the Digital Audio G4 or the Mirror Drive Door G4 towers, at least as far as expandability and gaming go. If you must have that iMac G4 look though there are always the more capable 1 and 1.25GHz models that should offer more in the way of early 2000’sOS X gaming capabilities.

5 Comments
I am no Apple fan but you got to love this one. What a great futuristic design.
Some hints and remarks:
Your 2003 iMac model does not officially support booting into MacOS 9, but there are hacks for it. A quick search found this page http://macos9lives.com/smforum/index.php?topic=1173.75 Some tinkering required.
WiFi: This is a first generation AirPort-Card in your iMac, limited to 802.11b. AirPort Software 3.3 is (or was already) upgrading the firmware of the card and gives you WPA encryption which is better than WEP but is still not the common WPA2. Likely you have to reconfigure your WiFi-base station to support it.
Your GeForce2 MX graphics card supports only mirroring on an external monitor, not expansion of the desktop surface. Even if your iMac had one of the better cards (GeForce 4 or GeForce FX 5200) Apple would not grant you the benefit of an expanded desktop (likely to protect sales of its PowerMac products). An Open Firmware hack is required. “Screen Spanning Doctor“ does it for you: http://www.rutemoeller.com/mp/ibook/ibook_e.html
Don’t be discouraged from the low version number 0.3.3. It’s a well proven utility.
The small daughter card on the iMacs logic board (“mother board“ for you PC-persons 🙂 is likely the (landline telephone) modem. It has to be easily exchangeable during hardware assembling because of different requirements for national telephone systems.
FireWire: Together with Target Disk Mode it is a vital part of what a Mac made a Mac. First, it provides a fast for it’s time (approx. 150% real-world-USB2-speed in 1999), powered (multiples of USB2’s meager 2.5W) universal interface to external devices such as hard- or DVD-drives, professional audio/video equipment and so on. And it was the interface for Target Disk mode, which gives you direct access to your internal hard drive. You can mount it as a normal external drive elsewhere. You may even boot up other Macs from it. This works perfectly even for different types of Macs (in OS X). I was using it daily in my multiple job times around 1997 (then with SCSI instead of FireWire). It is perfect for trouble shooting too, so you can install an OS on from another Mac. I was a life/work-saver for me. When my internal drives died (happened twice in 30 years of Mac-using), I connected my Mac to an external Firewire-hard drive, where I always keep a recent mirror-image of my internal HD, boot from it and continue my work. Compare this to booting Windows from an external drive! This is one of the main reasons why I choose a Mac for my daily work. On today‘s Macs Target-Disk Mode works with Thunderbolt and USB-C interfaces.
I found it very interesting that they used the laptop form factor for RAM in one slot but not for the other. For saving space I’d imagine a dual SODIMM socket you see in laptops would be better. Perhaps the higher cost of laptop RAM at the time could be the reason, the normal socket for the RAM from the factory and the SODIMM socket for user installable upgrades.
I found that pretty odd myself. A good theory though.
I’m quite sure this was done for cost reasons, why else would you place a large DIMM on an already cramped and odd-shaped logic board. I did not expect that a single memory-controller can handle two different formats, or does the iMac have two controllers?
@ Justin: How do you connect the iMac to the network?
I use a WiFi-USB-dongle instead of the encryption challenged AirPort-1-card in older devices. LowEndMac has an old (2009) list of compatible devices. https://lowendmac.com/2009/wifi-for-desktop-macs-running-mac-os-9/
I use a DWL-G122-stick (didn’t make the list, I think), but only RevC works with Macs. The driver software has a horrible configuration module. Once configured it works, but only if you plug the dongle in _AFTER_ booting has completed, quite annoying.