Designing Your Own Tessellations

Now that most of us have access to the internet, there’s a ton of good information out there about tessellations, so I’m not going to repeat it here.  Rather, here are just a couple of examples and then some references you can use on the internet or get at a book store.  With regard to the printed material, I have great luck finding used books to order online, mostly through AbeBooks.

The book I used most in learning about tessellations is Introduction to Tessellations by Dale Seymour and Jill Britton.  It’s an old book, but math doesn’t change much and it should be available second hand.  The take-home from this book is that tessellations are easier to design if you use graph paper of various kinds to guide your drawing.  Options include regular graph paper with squares, dot paper, and triangle paper, as well as paper pre-printed with hexagons.  If you check the internet, you can find places to print any of these, or there are samples in the back of the book for you to reproduce. The links above go to places that allow you to print various dot or triangle papers, but full disclosure: I haven’t tried them, since I have the book!

Another common way to make tessellations is to start with a piece of paper, cut a hunk out of it, and move the hunk to another edge.  There are many variations on this, and I suggest you get some index cards and just go for it.

Here are some tessellations I have made to illustrate various possibilities.

I cut a triangle out of the left side of the square and added it to the right side. Then I colored alternate squares differently so the pattern would be obvious
In this example, I have cut a square out, moved it to the other side, AND slid it down. The shapes still interlock just fine, but my head begins to spin at this point.
In this example, two squares were cut from each block and both moved directly across. We’ve all seen “puzzle block” quilts made like this.

It’s also possible to cut off a piece, move it to another location on the block, and then rotate it. At this point things become much more complex, and lead to the kind of tessellations that make almost anybody’s head spin! Luckily, there is an excellent step-by-step tutorial on how to do that at http://mathengaged.org/resources/activities/art-projects/tessellations/.

For a detailed lesson on how to make more complex tessellations (more like M. C. Escher), look at artist Juliana Kunstler’s website.

And here are a few of the many books available about tessellations:

Introduction to Tessellations by Dale Seymour and Jill Britton. This one is practical and relatively easy to understand.

Designing Tessellations by Jinny Beyer. This book goes into a lot of detail on how to make complex tessellations, but is easy to understand despite this. She has some beautiful examples of tessellated quilt patterns.

Tessellation Quilts by Christine Porter

For those in the Greensboro MQG, I hope you will design some tessellations and bring them for show-and-share in April! See you there!

Please note: As always, the links in this post are provided for your convenience only; they are not affiliate links that pay me if you click on them.

What Shapes Tesselate?

In addition to the practical way of designing tessellations presented last week by Jean Larson, there is a whole field of mathematical theory and practice related to tessellations.  I loved geometry in high school, but the theoretical stuff quickly gets beyond me.  Here is a summary of more practical implications.

A shape is said to tessellate if it can cover a plane without gaps, extending to infinity in all directions.

The regular polygons that will tesselate are:

  • Triangles.  All triangles will tessellate.
  • Quadrilaterals (4-sided shapes) all tessellate, and all can be divided into triangles, just by drawing from corner to corner.
  • Hexagons (regular hexagons) will tessellate, as we know well from English paper piecing.

From there it gets complicated as to which figures will tessellate and which will not, but to go on with practical information:

It’s perfectly OK to draw lines inside your tessellating shapes, which may mean they don’t all look alike anymore.  An excellent example is this pattern by Alison Glass.  The design is composed entirely of equilateral triangles, all the same size, BUT she has drawn lines within some of the triangles to create secondary designs.

Illustration from AlisonGlass.com

It’s OK to use more than one shape to cover a surface, or more than one size of the same shape, as long as the whole pattern can be continued to infinity.  (Who knew?)  Here’s are examples, drawn in EQ8:

This tessellating design is composed of squares of 2 different sizes

This tessellating design is composed of 2 different shapes.

Many of our traditional quilt patterns are actually tessellating designs.  The second example above is just a recoloring of Tumbling Blocks.

There are many, many ways to create tessellating designs, and I’ll direct you to some additional resources next week.  Meanwhile, one of my favorite easy ways to create tessellating designs is something called “pattern blocks“.  The link takes you to a fun site where you can develop patterns consisting of one or more shapes.  This works because the angles of all the pieces are either 30, 60, 90, or 120 degrees.  I just love that the site is intended for kids–it’s all I can do to wrap my head around it!  And I have no idea how to tell which combinations will tessellate except to try.  Here’s one I made on the site that I think will tessellate:

And FYI, the MQG published a brief article on tessellations back in January.  Access it here.  You’ll have to log in with your usual password first.

Next week: more resources to help you create tessellating designs.

Tessellations again!

In a moment of madness, I agreed to do a program on tessellations for my MQG in Greensboro.  I’ll be posting the same information here so we can all share it and so that these blogs can serve as “handouts” for my presentation.  To start, here’s a blog written by my friend Jean Larson, who has designed and made several award-winning tessellation quilts.  To view some of Jean’s quilts, click HERE.  –MJP

Tessellating designs make me happy.  Tweaking those designs is even more fun.   I want to share the joy of starting with a very, very simple design and watching it blossom.  

Start with a simple gridded block and create a light/dark design.  Here, I’ve started with a 3 x 3 grid.  Then re-color the same block with the lights and darks reversed

.The grid lines are only for design purposes, and each block can be constructed with a single square block with 2 corner triangles attached using any method you prefer.

Here are some design possibilities…Quilt_1A simple “cat head” quilt using only 2 colors.

Different looks can be achieved with variations in the color placement.

Blocks can be inverted and turned for even more quilt designs.

Just imagine all the possibilities with color in these!!!!!

It’s even more complex when you design with a 6×6 grid.  Here are the positive and negative versions of another block.

These blocks can be constructed using half-square triangles integrated with larger fabric pieces.  If these blocks were to finish at 6 inches by 6 inches.  The center column on each block would be a single 3.5 inch wide by 6.5 in long piece of fabric.  The side strips would include some half-square triangles.

A couple of the quilts that can be made:

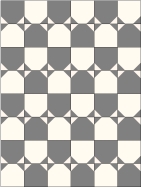
Looks like spools, some gray, some white, all standing up.  Same quilt with alternate blocks turned a quarter turn yields a different  clearly recognizable tessellation.  Reminds me of tessellating doggie rawhide chews 😉

Now back to the spool quilt from above.  The “thread” areas have been colored in.  No blocks have been turned.

Jean spool 5This shows the power of color and value (lightness and darkness).   The colored part, being next to the gray and being closer in value to the gray, unites those parts of the block, and gives the illusion that we have all gray spools on a white background, some standing up, some lying down.

I hope these examples can be the seeds to sprout some design experimentation with tessellating shapes.

  1. Start with 2 square grids
  2. Create a positive design, and its negative design
  3. Alternate them in a quilt layout
  4. PLAY!
  5. And play more with color!

Happy Quilting (and Designing)!!   –Jean Larson


Tessellations! By Jean Larson

As promised, my friend Jean Larson has written a tutorial on tessellation quilts.  I hope you enjoy it as much as I did!  –MJP

Tessellating designs make me happy.  Tweaking those designs is even more fun.   I want to share the joy of starting with a very, very simple design and watching it blossom.  My inspiration comes from this web site:  http://gwydir.demon.co.uk/jo/tess/

Start with a simple gridded block and create a light/dark design.  Here, I’ve started with a 3 x 3 grid.  Then re-color the same block with the lights and darks reversed

.The grid lines are only for design purposes, and each block can be constructed with a single square block with 2 corner triangles attached using any method you prefer.

Here are some design possibilities…Quilt_1A simple “cat head” quilt using only 2 colors.

Different looks can be achieved with variations in the color placement.

Blocks can be inverted and turned for even more quilt designs.

Just imagine all the possibilities with color in these!!!!!

It’s even more complex when you design with a 6×6 grid.  Here are the positive and negative versions of another block.

These blocks can be constructed using half-square triangles integrated with larger fabric pieces.  If these blocks were to finish at 6 inches by 6 inches.  The center column on each block would be a single 3.5 inch wide by 6.5 in long piece of fabric.  The side strips would include some half-square triangles.

A couple of the quilts that can be made:

Looks like spools, some gray, some white, all standing up.  Same quilt with alternate blocks turned a quarter turn yields a different  clearly recognizable tessellation.  Reminds me of tessellating doggie rawhide chews 😉

Now back to the spool quilt from above.  The “thread” areas have been colored in.  No blocks have been turned.

Jean spool 5This shows the power of color and value (lightness and darkness).   The colored part, being next to the gray and being closer in value to the gray, unites those parts of the block, and gives the illusion that we have all gray spools on a white background, some standing up, some lying down.

I hope these examples can be the seeds to sprout some design experimentation with tessellating shapes.

  1. Start with 2 square grids
  2. Create a positive design, and its negative design
  3. Alternate them in a quilt layout
  4. PLAY!
  5. And play more with color!

Happy Quilting (and Designing)!!   –Jean Larson